
Introduction
This is a continuation of this tutorial series of posts widget for Elementor. In this part 2 of the tutorial, we will learn about –
- How to add custom widget category.
- About the skeleton of the widget file.
- How to call and initiate the widget file in the main plugin class.
All other parts of this series can be found here –
- Concepts and basics of Elementor widget
- Part 2 – You are reading…
- Create the render template with dynamic content
- The controls and final output
- Project Files
Create the essential files
Before starting the part 2, we need to create few files and folder inside the main plugin folder “tartist-elementor-extension“.
- Create a CSS file named “style.css”.
- Create a folder named “widgets”.
- Inside the “widgets” folder, please create a blank php file named “tartist-posts-widget.php“
Your folder structure should look like this now –
tartist-elementor-extension
  -- tartist-elementor-extension.php
  -- style.css
  -- widgets
     -- tartist-posts-widget.php
Continue with our code
We were on the “tartist-elementor-extension.php”. We will add couple of functions here. One is for main widget file and the other one is for the custom category where we will display the widget.
Just after the admin_notice_minimum_php_version() function closes, add the following functions –
/**
 * Adding custom widget category
 */
public function tartistElementor__widget_categories( $elements_manager ) {

    $elements_manager->add_category(
        'tartist-widgets',
        [
            'title' => __( 'TemplateArtist', 'tartist-elementor-extension' ),
            'icon' => 'fas fa-plug',
        ]
    );

}

/**
 * Include widgets files and register them
 * @since 1.0.0
 * @access public
 */
public function init_widgets() {

    /**
     * Posts Widget
     */
    //Include Posts Widget File
    require_once( __DIR__ . '/widgets/tartist-posts-widget.php' );
    // Register posts widget
    \Elementor\Plugin::instance()->widgets_manager->register_widget_type( new \Tartist_Elementor_Posts_Widget() );

}
So we have added two new functions for custom category and widget itself. Now we need to call these two functions inside the public function init(). Let’s do it first. Then we will see what is going on with our newly added functions.
Go to public function init() and add the following code below –
// 1. Add Plugin actions
// here we will add actions to elementor widgets and controls
add_action( 'elementor/widgets/widgets_registered', [ $this, 'init_widgets' ] );

// 2. Register Widget Styles
// here we will add action to enqueue styles

// 3. Register custom categories
//here we will add actions to create a custom category for our widgets
add_action( 'elementor/elements/categories_registered', [ $this, 'tartistElementor__widget_categories' ] );
Notice, we have left blank the register widget style area. In this area, we can call another custom function for widget specific css files. But as we have only one widget, we will not use this. Later, we will enqueue our generic style.css file for entire plugin at once.
Moving forward, the function named tartistElementor__widget_categories() registers our own category for the widgets. This function accepts a single elementor parameter which is $elements_manager. We are actually extending it with the category ID which is tartist-widgets and the title and icon parameter for global use. Later we will see the usage of it.
The second function we have created is init_widgets(). This is the function for all of our widget registration. In this plugin, we have only 1 widget for recent posts. but in a similar way, we can register more widgets inside this function. For every widget, we need two steps to follow.
First, we need to call the widget file as we did require_once( __DIR__ . '/widgets/tartist-posts-widget.php' ); and then we need to register the widget with calling the class like this – \Elementor\Plugin::instance()->widgets_manager->register_widget_type( new \Tartist_Elementor_Posts_Widget() );
The widget file
As you can see we have called a class Tartist_Elementor_Posts_Widget() from the “tartist-posts-widget.php” file, we now need add code to that file. Let’s go to the widgets folder and open the file in the code editor.
The skeleton of the widget
Inside the “tartist-posts-widget.php” file, paste the following code as advised by Elementor developers guide and then we will start coding each section one by one.
<?php
/**
 * Elementor Posts Widget.
 * Elementor widget that inserts recent posts content into the page.
 * @since 1.0.0
 */
class Tartist_Elementor_Posts_Widget extends \Elementor\Widget_Base {

    /**
     * Get widget name.
     * @return string Widget name.
     */
    public function get_name() {}

    /**
     * Get widget title.
     * @return string Widget title.
     */
    public function get_title() {}

    /**
     * Get widget icon.
     * @return string Widget icon.
     */
    public function get_icon() {}

    /**
     * Get widget categories.
     * @return array Widget categories.
     */
    public function get_categories() {}

    /**
     * Register Posts widget controls.
     * Adds different input fields to allow the user to customize the widget settings.
     * @since 1.0.0
     * @access protected
     */
    protected function _register_controls() {}

    /**
     * Render Posts widget output on the frontend.
     * Written in PHP and used to generate the final HTML.
     * @since 1.0.0
     * @access protected
     */
    protected function render() {}

}
Description of the skeleton code
As you can see, we have to extend the core Elementor class \Elementor\Widget_Base for every new widget class we make. Inside this class, we have placed 6 methods which will allow us to construct the widget. Though everything inside is commented and easy to understand, we will start instantly.
The first method get_name() allows us to create our widget ID. Followed by the second method get_title() will allow us to create the human readable widget title, then the third method get_icon() allow us to use the FontAwesome icon the widget and then the 4th method get_categories() will allow us to assign the widget to our own category or any of the default category of Elementor. These all are public methods which we will code right now.
Add the following code to the respected methods –
public function get_name() {
	return 'tartist_posts';
}
public function get_title() {
	return __( 'Posts Grid', 'tartist-elementor-extension' );
}
public function get_icon() {
	return 'fas fa-plug';
}
public function get_categories() {
	return [ 'tartist-widgets' ];
}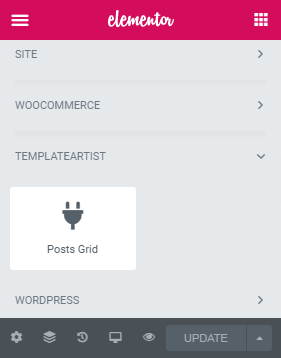
At this point, you can see our widget in the Elementor page edit mode as displayed in the image. However, we still have not created the 5th method _register_controls() and 6th method render(). So if you drag and drop our widget to the page, right now nothing will happen.
In our next tutorial, we will add controls for our widget in proper tabs and also will add the code for render method. In between, you may have a first look at the available controls of Elementor.