This is going to be the final part of the tutorial series “How to create recent posts widget”. We will be learning to add specific controls for the content and style of our post widget. Let’s quickly jump into it.
Previous parts can be found here –
- Concepts and basics of Elementor widget
- The skeleton of the widget
- Widget controls and render
- Part 4 – You are reading…
- Project Files
Continue with the post widget code
As per our planning for the controls in part 3 of this series, we will be adding codes for the content tab first. Please open the “tartist-posts-widget.php” and go to the “_register_controls()” function. Let’s create the content tab first with the following code –
The content controls
protected function _register_controls() {

    /**
     * Add content tab
     */
    $this->start_controls_section(
        'content_section',
        [
            'label' => __( 'Content', 'tartist-elementor-extension' ),
            'tab'   => \Elementor\Controls_Manager::TAB_CONTENT,
        ]
    );

    //add controls here for this tab

    $this->end_controls_section();
    //End of the control section for "content_section"

}
If you notice, we have started the control section with $this->start_controls_section() method and ended this section with $this->end_controls_section(). All our control settings will go in between this area as described in the code itself.
The 'tab' => \Elementor\Controls_Manager::TAB_CONTENT is the identifier for the tab type. Let’s create the controls for this tab. Add the following code right below this line – //add controls here for this tab –
//Total Posts Control
$this->add_control(
'total_posts',
[
'label' => __( 'Total Posts', 'tartist-elementor-extension' ),
'type' => \Elementor\Controls_Manager::NUMBER,
'min' => 1,
'max' => 100,
'step' => 1,
'default' => 3,
]
);
//Excerpt Length Control
$this->add_control(
'excerpt_length',
[
'label' => __( 'Excerpt Length', 'tartist-elementor-extension' ),
'type' => \Elementor\Controls_Manager::NUMBER,
'min' => 1,
'max' => 100,
'step' => 1,
'default' => 25,
]
);
//Toggle display for post elements
$this->add_control(
'remove_post_elements',
[
'label' => __( 'Remove Post Elements', 'tartist-elementor-extension' ),
'label_block' => true,
'type' => \Elementor\Controls_Manager::SELECT2,
'multiple' => true,
'options' => array(
'image' => esc_html__('Featured Image','tartist-elementor-extension'),
),
'default' => [],
]
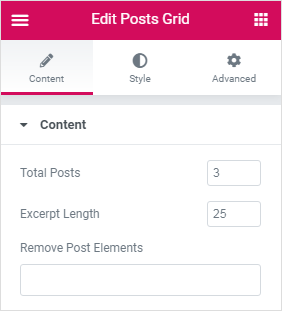
);At this point, if you refresh the page, you will see the content tab with these settings. This is an image reference –
Now, let’s quickly update the render() function so then our changes can be reflected in page. Please go to the function and add the following code inside on top.
protected function render() {
        //enable settings
        /* we can access settings like this $settings['total_posts'] */
	$settings = $this->get_settings_for_display();
    ?>
This line of code $settings = $this->get_settings_for_display(); inside the render function, will enable to access all of our settings that we have added inside the _register_controls() function. Now, we can access settings like this $settings['total_posts']. Where ‘total_posts’ is the ID of that control.
The style controls
Let’s quickly add the controls for style tab. Add the following code to the _register_controls() just below this line – //End of the control section for "content_section"
/**
* Layout Settings
*/
$this->start_controls_section(
'layout_settings',
[
'label' => __( 'Layout Settings', 'tartist-elementor-extension' ),
'tab' => \Elementor\Controls_Manager::TAB_STYLE,
]
);
$this->add_responsive_control(
'cols_per_row',
[
'label' => __( 'Columns per row', 'tartist-elementor-extension' ),
'type' => \Elementor\Controls_Manager::NUMBER,
'min' => 1,
'max' => 6,
'step' => 1,
'default' => 3,
'selectors' => [
'{{WRAPPER}} .tartist-posts-grid__wrap' => 'grid-template-columns: repeat({{VALUE}}, 1fr);',
],
]
);
$this->add_responsive_control(
'space_between',
[
'label' => __( 'Spacing (em)', 'tartist-elementor-extension' ),
'type' => \Elementor\Controls_Manager::NUMBER,
'min' => 1,
'max' => 6,
'step' => 1,
'default' => 1.5,
'selectors' => [
'{{WRAPPER}} .tartist-posts-grid__wrap' => 'grid-gap: {{VALUE}}em;',
],
]
);
$this->add_control(
'item_border_radius',
[
'label' => __( 'Item Border Radius(px)', 'tartist-elementor-extension' ),
'type' => \Elementor\Controls_Manager::NUMBER,
'min' => 1,
'max' => 10,
'step' => 1,
'default' => '',
'selectors' => [
'{{WRAPPER}} .tartist-posts-grid__post' => 'border-radius: {{VALUE}}px;',
],
]
);
$this->end_controls_section();
//end of "layout_settings" control in style tab
/**
* Color Settings
*/
$this->start_controls_section(
'color_settings',
[
'label' => __( 'Color Settings', 'tartist-elementor-extension' ),
'tab' => \Elementor\Controls_Manager::TAB_STYLE,
]
);
$this->add_control(
'bg_color',
[
'label' => __( 'Background Color', 'tartist-elementor-extension' ),
'type' => \Elementor\Controls_Manager::COLOR,
'scheme' => [
'type' => \Elementor\Scheme_Color::get_type(),
'value' => \Elementor\Scheme_Color::COLOR_1,
],
'selectors' => [
'{{WRAPPER}} .tartist-posts-grid__post' => 'background-color: {{VALUE}};',
],
]
);
$this->add_control(
'text_color',
[
'label' => __( 'Text Color', 'tartist-elementor-extension' ),
'type' => \Elementor\Controls_Manager::COLOR,
'scheme' => [
'type' => \Elementor\Scheme_Color::get_type(),
'value' => \Elementor\Scheme_Color::COLOR_2,
],
'selectors' => [
'{{WRAPPER}} .tartist-posts-grid__post' => 'color: {{VALUE}};',
'{{WRAPPER}} .tartist-posts-grid__post h3 a' => 'color: {{VALUE}};',
'{{WRAPPER}} .tartist-posts-grid__post .tartist-widget-btn' => 'color: {{VALUE}};',
],
]
);
$this->end_controls_section();
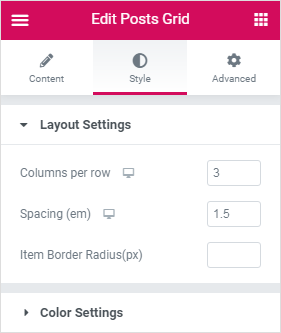
//end of "color_settings" controls in the style tabNow, if you refresh the Elementor edit page, you can see the style tab has 2 sections of controls which are “Layout Settings” and “Color Settings“. An image reference is given below –
If you notice, we have used 2 “add_responsive_control” in our code. This will enable settings for tablet and mobile view for the widget. Elementor has a great feature which creates automatic CSS files if we assign “'selectors' => [ ]” to a control. This is basically telling the Elementor to create CSS code for the assigned selectors. So we will have to do nothing for the Style tab controls in our render() function. It will automatically do the CSS code for us. Similarly, for the “Advanced” tab controls, Elementor will automatically handle the CSS code for the wrappers.
For the Content tab controls, we have to add some PHP code to our render() method. Le’ts update the render() function as per the given code below –
protected function render() {
        //enable settings
        $settings = $this->get_settings_for_display();
        //available content control ID's are
        //total_posts, excerpt_length, remove_post_elements
    ?>
    <div class="tartist-widget tartist-posts-grid">
        <div class="tartist-posts-grid__wrap">

            <?php
                $args = array(
                    'post_type'             => 'post',
                    'ignore_sticky_posts'   => true,
                    'post__not_in'          => array( get_the_ID() ),
                    'post_status'           => 'publish',
                    'posts_per_page'        => $settings['total_posts'] ? $settings['total_posts'] : 10,
                );

                $the_query = new WP_Query( $args );

                // The Loop
                if ( $the_query->have_posts() ) :
                    while ( $the_query->have_posts() ) : $the_query->the_post();
            ?>
            <div class="tartist-posts-grid__post">

                <?php if( !in_array("image", $settings['remove_post_elements'] ) && has_post_thumbnail() ) { ?>
                    <div class="post-thumbnail">
                        <?php the_post_thumbnail('medium_large'); ?>
                    </div>
                <?php } ?>

                <div class="post-content">
                    <div class="post-content__title">
                        <?php
                            printf(
                                '<h3><a href="%s">%s</a></h3><span>%s</span>',
                                esc_url( get_the_permalink() ),
                                esc_html( get_the_title() ),
                                esc_html( get_the_date() )
                            );
                        ?>
                    </div>
                    <div class="post-content__content">
                        <p><?php echo esc_html( wp_trim_words( get_the_excerpt(), $settings['excerpt_length'] ) ); ?></p>
                        <?php
                            printf(
                                '<a href="%s" class="tartist-widget-btn">%s</a>',
                                esc_url(get_the_permalink()),
                                esc_html__('Read More','tartist-elementor-extension')
                            );
                        ?>
                    </div>
                </div>

            </div>
            <?php
                    endwhile;
                else:
                    echo esc_html__('Sorry, no item found in this criteria.','tartist-elementor-extension');
            endif; //endif

            // Reset Post Data
            wp_reset_postdata();
            ?>

        </div>
    </div>

<?php }/* render() ENDS HERE */
At this point, if your code is properly followed by this series of tutorial, you will have a working recent post widget with proper controls for Elementor.
Congrats on your success
Now you have become an Elementor developer. Experiment with your own code for the render and controls and let me know if you have any questions. I will try my best here.
Plugin repository and download
You can download the source code or contribute to the plugin repository at the GitHub page of this plugin.